Map Magic
Now that everything is locked up in ice until spring, all we can do is dream about the tribs opening up again. But there are some important things you can do to get ready for next spring's runs. There are all the usual tasks: Wiping down rods, cleaning ferrule joints, swabbing guides, cleaning reels and backing down drags, cleaning line, repairing waders etc. All important tasks because North Shore tribs and the sediment they carry are heck on equipment.
Then there are things like restocking the fly-boxes, making leaders or slinkies, tying spawn... If you're like me, the vest finally gets pulled out of the trunk and gets a once-over. My vest is usually an atrocious collection of debris and junk come November that takes hours to sort out, having been piled into the car in late March and staying there until freeze-up. Even simple things like waxing a stubborn zipper can save you from big headaches later on.
I also like to go back over notes I've made so that I can do some winter scouting. Now I'm not talking about strapping on snowshoes and walking the streams (although that can be really enjoyable), I'm talking about using some simple but effective tools to put together plans for next year.
Some of the best at-home tools available to you come in the form of aerial/sattelite photos available from a number of sources. Three very good ones are: Google, Yahoo and the MN DNR aerial imagery although there are many others. It's always good to look at multiple sources due to the vagaries of this type of imagery. Sometimes the sun angle is bad causing bright reflections that obscure stream features, sometimes the time of year the imagery was captured means too much overhead cover in the form of tree canopy which hides the stream etc; but usually you can find a suitable image to create your own custom tributary map library.
Now there are tons of free apps out there available to create this kind of imagery, but I'm going to show you a relatively simple method that only requires MS Paint to pull off (sorry everyone, I'm not much of a MAC guy not having access to one).
So here's the basic method, I'll use Google imagery as the example:
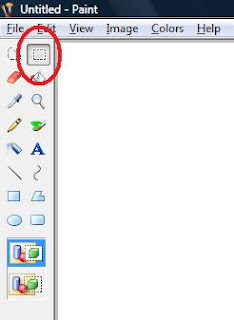
First open up MS Paint. Now click on the “Select” icon (highlighted by the red circle). This allows you complete the third step.
Step two- Open up your browser, go to Google and hit the "Maps" link on the top left part of the screen. If you stay on the “Street Map” selection, navigation and zoom is quicker than immediately selecting “Satellite Imagery”. You can also navigate to an area by typing in a name. Sometimes typing a town in the search box close to the river you want works better than typing the river name itself, just depends on the search engine’s base map. Once you’ve found your trib, select “Satellite Imagery”, then zoom in so you can see the finer details of the area you’re interested in. Some key types of features you should be looking for are: Barrier falls, ledges, riffle sections, gravel stretches or larger holes. If you want to view a larger area on your screen, hitting the F11 button on your keyboard will hide the search bar and increase the viewing area. To view the search bar again, just hit F11 again and it will drop back into place.
Step three- While pressing the “Alt” key (next to the space bar), press the “Print Screen” button above the numeric pad on your keyboard (Alt+Print Screen). Next, toggle back to Paint and making sure the “Select” button has been pressed, click once anywhere in the paint area with your cursor then press the “Ctrl” and “V” keys (Ctrl+V). This will paste your screen shot from the satellite imagery into Paint. From there you can use the simple tools in Paint to highlight areas you are interested in like in the example below (Click photo for larger image):
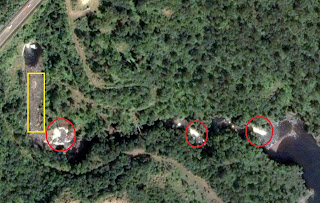
Notice I’ve done some simple highlighting. The red circles are falls and the yellow box is a gravel section. If you use Google “My Maps”, any information you call up: Distance Measurements, GPS Coordinates, Topographic Information etc., will also be transferred to your map in Paint. The possibilities are endless but basically you can customize the map any way you want.
If you want to make larger maps, you can make your own mosaics by opening up a second Paint window, pasting the new imagery there, then copying it to your original by edge-matching the photos. The only thing you’ll need to do when making large mosaics is to expand the original blank Paint window BEFORE you start by resizing it under the “Image” button.
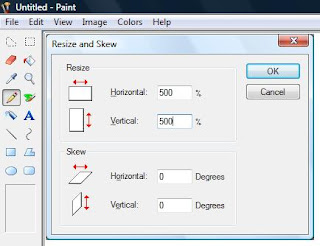
Usually 500% resizing in both Vertical/Horizontal will cover just about any size map mosaic you want to make. After that you just need to paste in your imagery, save it to file and that’s it. The image below is the Adult/Juvenile trap on the Knife and demostrates the quality of map you can produce (Click photo for larger image):

What’s really useful is that you can scout new streams you’ve never fished before. This allows you to get a good idea of what areas to start with on your first trip. You can also pick out features of familiar streams and areas to target on future trips, customize your maps with all sorts of information, and even e-mail them to fishing friends. The possibilities are varied and nearly endless, so give it a whirl.
Regards and Good Fishing-
NMF
Then there are things like restocking the fly-boxes, making leaders or slinkies, tying spawn... If you're like me, the vest finally gets pulled out of the trunk and gets a once-over. My vest is usually an atrocious collection of debris and junk come November that takes hours to sort out, having been piled into the car in late March and staying there until freeze-up. Even simple things like waxing a stubborn zipper can save you from big headaches later on.
I also like to go back over notes I've made so that I can do some winter scouting. Now I'm not talking about strapping on snowshoes and walking the streams (although that can be really enjoyable), I'm talking about using some simple but effective tools to put together plans for next year.
Some of the best at-home tools available to you come in the form of aerial/sattelite photos available from a number of sources. Three very good ones are: Google, Yahoo and the MN DNR aerial imagery although there are many others. It's always good to look at multiple sources due to the vagaries of this type of imagery. Sometimes the sun angle is bad causing bright reflections that obscure stream features, sometimes the time of year the imagery was captured means too much overhead cover in the form of tree canopy which hides the stream etc; but usually you can find a suitable image to create your own custom tributary map library.
Now there are tons of free apps out there available to create this kind of imagery, but I'm going to show you a relatively simple method that only requires MS Paint to pull off (sorry everyone, I'm not much of a MAC guy not having access to one).
So here's the basic method, I'll use Google imagery as the example:
First open up MS Paint. Now click on the “Select” icon (highlighted by the red circle). This allows you complete the third step.

Step two- Open up your browser, go to Google and hit the "Maps" link on the top left part of the screen. If you stay on the “Street Map” selection, navigation and zoom is quicker than immediately selecting “Satellite Imagery”. You can also navigate to an area by typing in a name. Sometimes typing a town in the search box close to the river you want works better than typing the river name itself, just depends on the search engine’s base map. Once you’ve found your trib, select “Satellite Imagery”, then zoom in so you can see the finer details of the area you’re interested in. Some key types of features you should be looking for are: Barrier falls, ledges, riffle sections, gravel stretches or larger holes. If you want to view a larger area on your screen, hitting the F11 button on your keyboard will hide the search bar and increase the viewing area. To view the search bar again, just hit F11 again and it will drop back into place.
Step three- While pressing the “Alt” key (next to the space bar), press the “Print Screen” button above the numeric pad on your keyboard (Alt+Print Screen). Next, toggle back to Paint and making sure the “Select” button has been pressed, click once anywhere in the paint area with your cursor then press the “Ctrl” and “V” keys (Ctrl+V). This will paste your screen shot from the satellite imagery into Paint. From there you can use the simple tools in Paint to highlight areas you are interested in like in the example below (Click photo for larger image):

Notice I’ve done some simple highlighting. The red circles are falls and the yellow box is a gravel section. If you use Google “My Maps”, any information you call up: Distance Measurements, GPS Coordinates, Topographic Information etc., will also be transferred to your map in Paint. The possibilities are endless but basically you can customize the map any way you want.
If you want to make larger maps, you can make your own mosaics by opening up a second Paint window, pasting the new imagery there, then copying it to your original by edge-matching the photos. The only thing you’ll need to do when making large mosaics is to expand the original blank Paint window BEFORE you start by resizing it under the “Image” button.

Usually 500% resizing in both Vertical/Horizontal will cover just about any size map mosaic you want to make. After that you just need to paste in your imagery, save it to file and that’s it. The image below is the Adult/Juvenile trap on the Knife and demostrates the quality of map you can produce (Click photo for larger image):

What’s really useful is that you can scout new streams you’ve never fished before. This allows you to get a good idea of what areas to start with on your first trip. You can also pick out features of familiar streams and areas to target on future trips, customize your maps with all sorts of information, and even e-mail them to fishing friends. The possibilities are varied and nearly endless, so give it a whirl.
Regards and Good Fishing-
NMF


Comments